1. TensorRT (TRT) 가 무엇인가
원문 인용
TensorRT is a programming framework that allows us to optimize models efficiently: layer’s fusion, changing variable type for DNN, etc. It is a hardware-dependent framework - it means that you cannot create an optimized model with a given system configuration and use it for another configuration.
TensorRT 는 NVIDIA 에서 제작한 모델을 최적화해주는 프레임워크다. layer fusion, 자료형 변경 등의 기능을 수행한다. TensorRT 를 활용해 특정 시스템 설정에 최적화된 모델을 만들 수 있다. (반대로, 당연히 다른 시스템으로 옮겨간다면 기존의 최적화방식은 사용할 수 없다.)
함께 읽으면 좋은 자료 : what is tensorRT?


참고로, ARM 베이스 CPU 에서 딥러닝 연산을 효율적으로 할 수 있게 제작한 Tensorflow Lite 라는 프레임워크도 있다. 이 또한 Tensorflow 프레임워크 안에 작은 프레임워크로 존재한다.
원문 인용
Another benefit of using TensorRT is that it has an integrated interface for TensorFlow. It is a kind of fused semi framework for acceleration inside Tensorflow session with the usage of TensorRT optimized operators, engines, segments, mixed with Tensorflow nodes.
TF-TensorRT 는 Tensorflow 프레임워크 안의 작은 프레임워크다. TF-TensorRT 는 Tensorflow Session 안에서, operators (tensor ops 라고도 부른다) 및 다양한 것들을 최적화된 형태로 만들어 준다고 생각하면 된다.
TF-TensorRT는 TF-TRT 라고도 불리며, TF-TensorRT (TF-TRT) 를 TensorRT 와 동치라고 생각하는 것은 오해이다. 왜냐하면, TF-TensorRT 는 Tensorflow 프레임워크 안의 작은 모듈같은 존재인 반면, TensorRT 자체는 NVIDIA 가 직접 만든 최적화 프레임워크로, Tensorflow 와 독립적으로 구동될 수 있기 때문이다. Tensorflow 1.7 에서는 Google Tensorflow Team 과 NVIDIA 가 협업하여 TensorFlow 내부에 TensorRT 를 넣어서, 사실상 통합되었다고 이야기한다. 이름에 'Tensor' 이라는 이름이 붙어서 그런데 사실은 그냥 결이 다른 놈이다.
1-1. TensorRT 가 어떤 것들을 최적화시켜 주는가?
1-1-1. Quantization & Precision Calibration (양자화 및 정밀도 캘리브레이션)
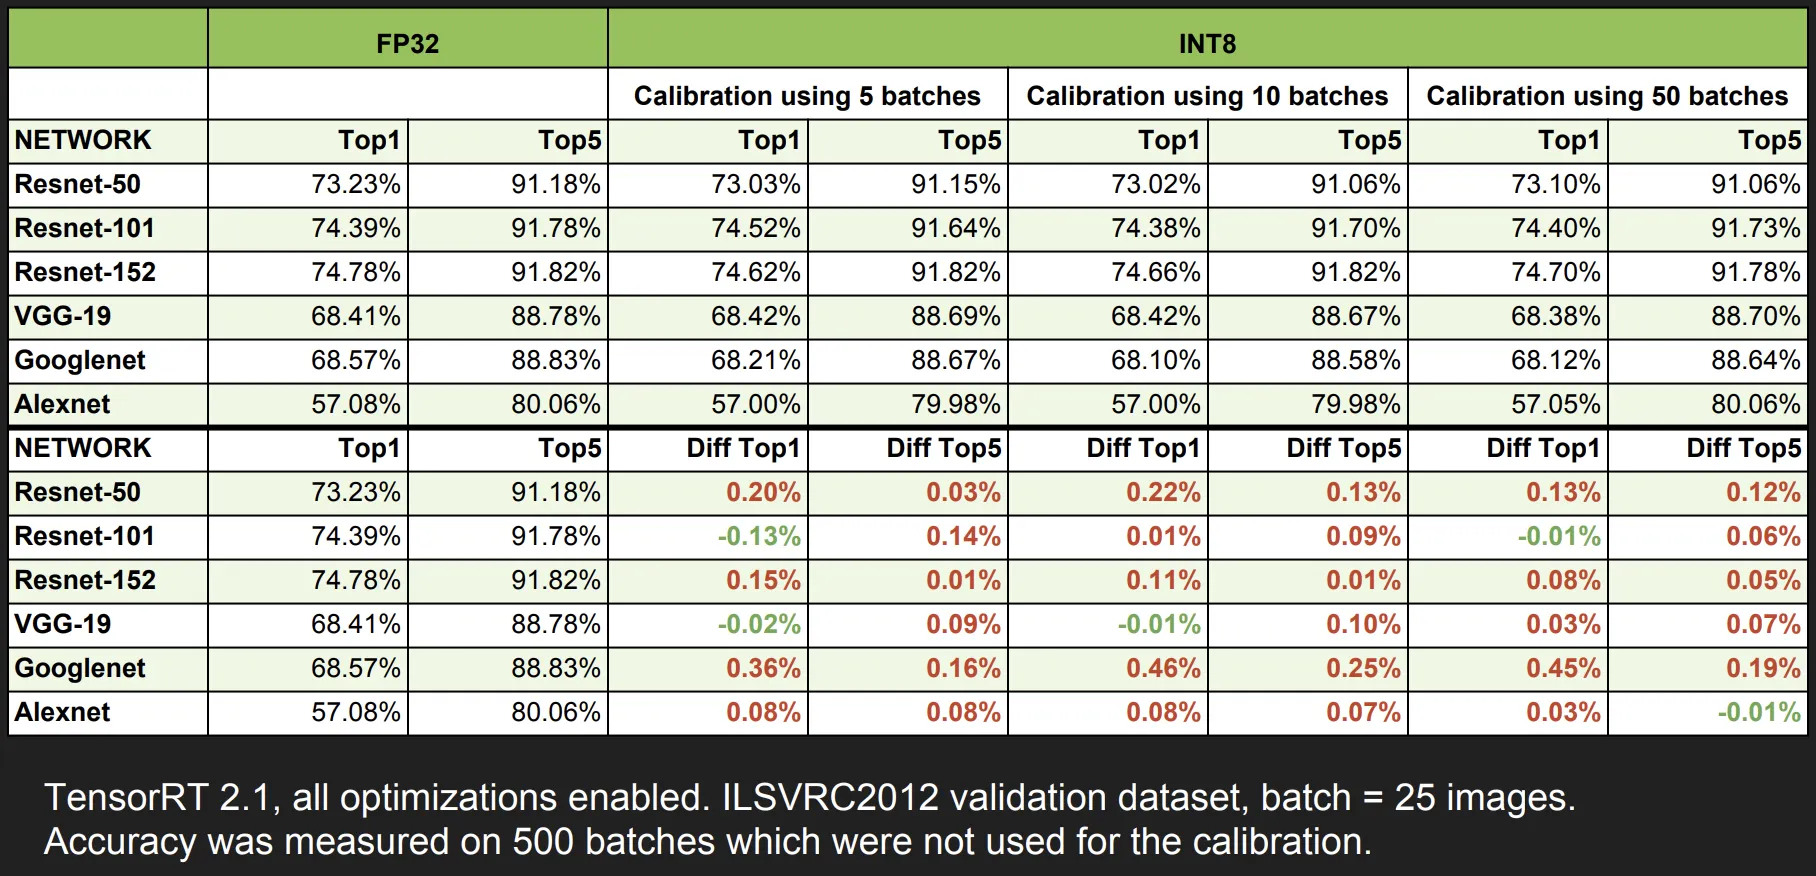
딥러닝의 학습 및 추론에서 정밀도(Precision)를 낮추는 일은 거의 일반적인 방법이 되었다. 낮은 정밀도를 가지는 신경망일수록 데이터의 크기 및 가중치들의 bit 수가 작기 때문에 더 빠르고 효율적인 연산이 가능하다. 이를 위한 양자화 기법중 TensorRT는 Symmetric Linear Quantization 을 사용하고 있으며, 이를 통하여 딥러닝 프레임워크의 일반적인 FP32의 데이터를 FP16 및 INT8 의 데이터 타입으로 정밀도를 낮출 수 있다.

일반적으로 FP16 의 데이터 타입으로 정밀도를 낮추는 것은 모델 정확도에 큰 영향을 주지는 않지만, INT8의 데이터 타입으로 정밀도를 낮추는 것은 모델 정확도에 영향을 주기 때문에 추가적으로 캘리브레이션 작업이 필요하다. 이를 위해 TensorRT 에서는 EntropyCalibrator, EntropyCalibrator2, MinMaxCalibrator 를 지원하고 있으며, 이를 활용하여 양자화 시 가중치 및 intermediate tensor 들의 정보의 손실을 최소화 할 수 있다.
1-1-2. Graph Optimization (그래프 최적화)
일반적으로 그래프 최적화는 딥러닝 신경망에서 사용되는 아주 원시적인 (Primitive computation. 예를 들어, Add) 연산 형태, 복합적인 (Compound computation, 예를 들어, Convolution) 연산 형태의 그래프 노드들을 각 플랫폼에 최적화된 코드들로 구성하기 위하여 사용된다. TensorRT 에서는 이를 실현하기 위해 Layer Fusion 방식과 Tensor Fusion 방식을 동시에 적용하고 있다. Layer Fusion은 Vertical Layer Fusion, Horizontal Layer Fusion이 적용되고,또한 Tensor Fusion이 적용되어 모델 그래프를 단순화 시켜주어 모델의 Layer 수가 크게 감소하게 된다. 실제로 TensorRT를 사용하여 ResNet, MobileNet 과 같은 백본 신경망들을 최적화 하면 기존 노드 수가 몇 십배 까지 줄어드는 효과를 보았었다.
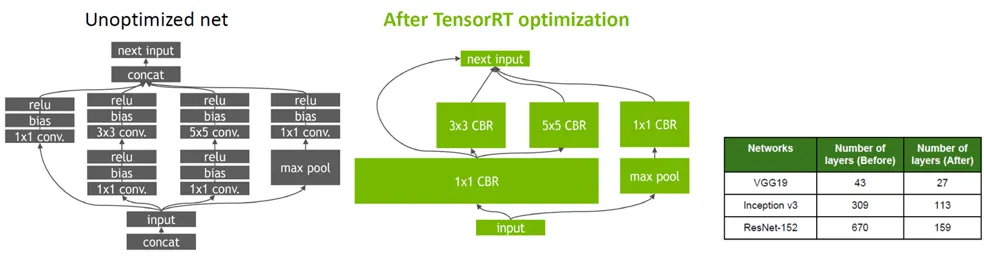
NVIDIA 의 말에 따르면, operation 들을 combine 하는 이유는, GPU 의 경우에는 연산하는 그 자체보다 kernel 을 부르는것이 훨씬 overhead 가 크기 때문이라고 한다.
최적화되지 않는 노드들은 그냥 원래 tensorflow 처럼 구동된다.
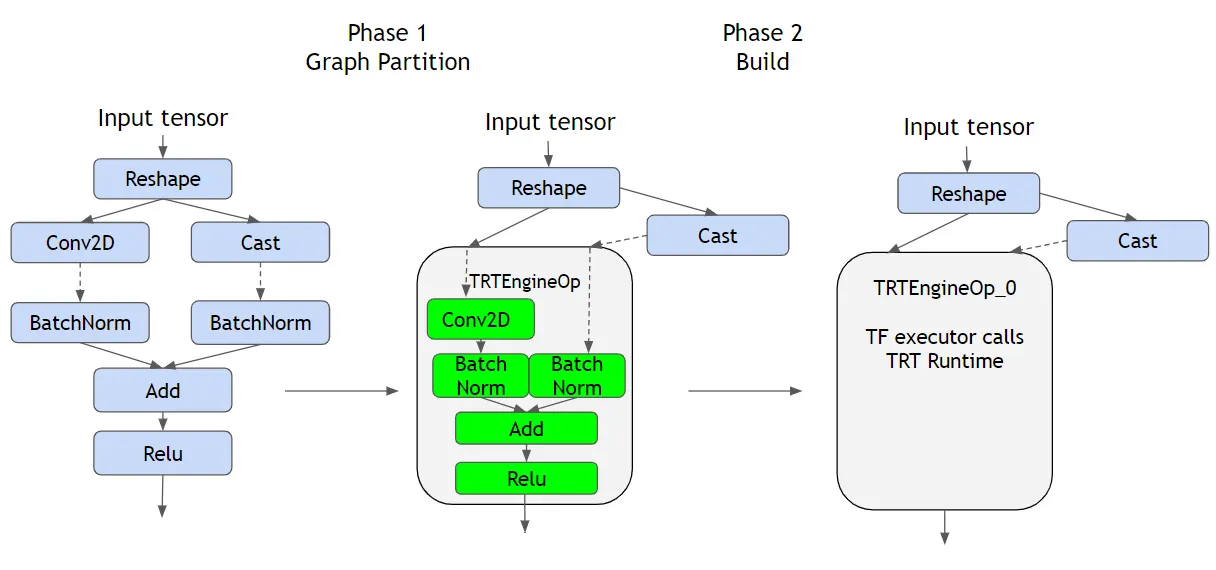
Conv2D-BNorm-Add-Relu 는 지원하는 레이어이기 때문에, 이것들을 한방에 TRT Engine 으로 묶어 버리고, 나머지 부분 (연하늘색 부분) 은 TensorFlow 에게 맡긴다.
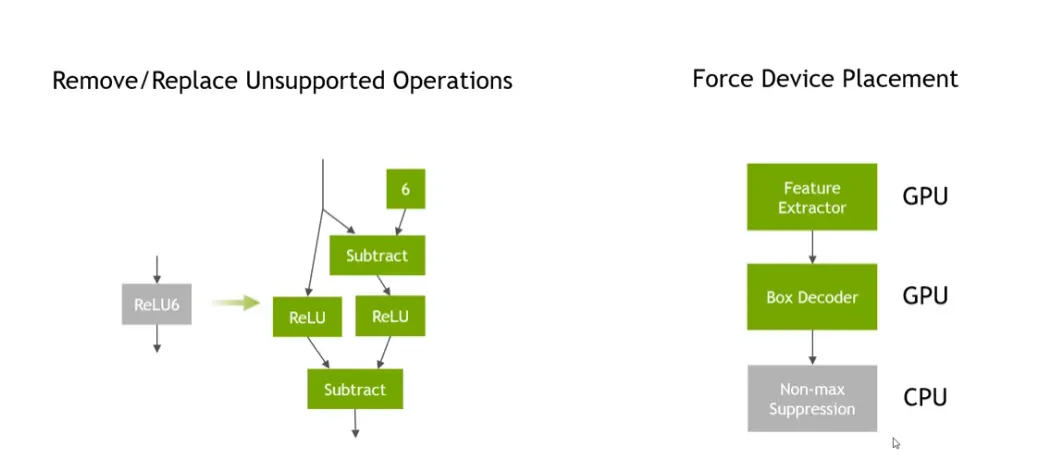
또, GPU 에서 온전히 호환되지 않는 연산이 포함된 대단위 연산의 경우, CPU 에서만 수행하도록 하여 하나의 큰 단위에서 데이터가 CPU 와 GPU 를 왔다갔다 하지 않도록 강제하기도 한다. 예를 들어, NMS 라는 하나의 추상적인 연산 속에는, 일부는 GPU 에서 연산할 수 있지만 일부는 CPU 에서만 연산을 해야한다고 생각해 보자. 이 때, 경우에 따라 CPU-GPU 를 왔다갔다하는 것은 비효율적일 것이라는 전제이다.
tensorRT 에서 지원하지 않는 op 를 쓰거나 복잡한 branching 등을 하게 되면, 최적화가 불가능하거나 그 효과가 미미할 수도 있다. CUDA engine 을 통한 inference 도 불가능할 수 있다. 모델을 효율적으로 만들겠다고 복잡한 브랜칭을 하고 정말 복잡한 아키텍처를 만들어 버리게 되면, TFTRT 를 통해 최적화를 하려고 하는 경우에 기존만도 못할 수 있다는 이야기가 된다.
어떤 모델의 이슈 인용
In our case, TensorRT could not properly convert this model to a standalone TensorRT plan for inference on the CUDA engine. Our model had a complicated branching and some specific paddings which are not supported by TensorRT.
1-1-3. Kernel Auto-tuning (커널 자동 튜닝)
TensorRT 는 NVIDIA의 다양한 플랫폼 및 아키텍쳐에 맞는 Runtime 생성을 도와준다. 각 제품들은 CUDA engine 의 갯수, 아키텍쳐, 메모리 그리고 Serialized engine 포함 여부에 따라 최적화 된 커널이 다르기 때문에 이를 TensorRT Runtime engine build 시 선택적으로 수행하여 최적의 engine binary 생성을 돕게된다.
이 때문에 A 라는 GPU 에서 TRT 를 통해 최적화한 모델은 B 라는 GPU 에서 사용이 불가능한 것이 아닐까? 이에 대해서는 글 하단에 설명한다.
1-1-4. Dynamic Tensor Memory & Multi-stream execution (동적 텐서 메모리 및 멀티 스트림 실행)
그 외에도 메모리 관리를 통하여 footprint 를 줄여 재사용 할 수 있도록 도와주는 Dynamic tensor memory 기능이 존재하며, CUDA Stream 기술을 이용하여 multiple input stream 의 스케쥴링을 통해 병렬 효율을 그대화 할 수 있는 Multi-stream execution 기능도 존재한다.
뭐라냐
1-1-5. Conclusion : Benefits
이러한 가속화 기술들을 이용하여 TensorRT는 "속도 향상" 이라는 결과를 얻을 수 있게 된다.
기본적으로 ResNet50 기준으로 볼 때 동일한 GPU 에서 TensorRT 를 사용하는 것만으로도 대략 8배 이상의 성능 향상 효과가 있다고 한다. 필자도 실제로 모델을 최적화 시켰을 때 Pytorch 나 TensorFlow 모델의 추론 속도에 비해 TensorRT Engine 화 하였을 때의 모델 추론 속도가 적게는 5배에서 많게는 10배 까지 속도 향상 결과를 맛봤다. 모델 백본에 따라 성능 차이는 있겠지만 딥러닝 서비스를 배포하기 위해 속도 측면에서 TensorRT가 핵심적인 역할을 수행할 수 있었다.
함께 읽으면 좋은 자료 : you can find an introduction to the TF-TRT.


함께 읽으면 좋은 자료 : 본문에 삽입된 자료 및 내용 출처

tensorflow 블로그 공식 자료 : TensorRT 자세히 알기


함께 읽으면 좋은 자료 : 흔히 들 수 있는 의문
Q. tensorRT 를 통해야만 CUDA engine 을 사용할 수 있는 것인가?
A. 그것은 아니지만, tensorRT 가 NVIDIA 의 GPU 를 고려하여 만들어진 프레임워크이기 때문에, CUDA 를 잘 몰라도, 적절하게 최적화가 될 것이라고 생각해볼 수 있다. 정확히 이야기하면, tensorRT 의 성능을 온전히 뽑아내기 위해 CUDA 가 반드시 필요한 것이다. tensorRT 가 CUDA 보다 high level 이라고 생각하면 된다.
함께 읽으면 좋은 자료 : Tensorflow Lite 와의 차이
함께 읽으면 좋은 자료 : TensorRT Model 의 사용범위
TensorFlow blog 를 참고하면 이런 내용이 나온다. "TensorRT execution engine should be built on a GPU of the same device type as the one on which inference will be executed as the building process is GPU specific."
그도 그럴 것이, 모든 GPU 마다 지원하는 기계어가 조금씩 다르고, 최적화 방식도 조금씩 다를 수 있기 때문에, A 라는 GPU 에 올리기 위해 만들어낸 TensorRT Model 이 B 라는 GPU 에서 작동되지 않을 수 있다.
2. tensorRT 사용법
TensorRT는 Keras 모델을 이용하여 TensorRT 엔진을 생성할 수도 있고, TensorFlow 모델을 이용하여 Freeze 된 pb 파일을 만든 뒤 uff parser 를 통해 TensorRT 엔진을 생성할 수 도 있고, Caffe 모델을 이용하여 TensorRT 엔진을 만들 수도 있고, Pytorch 모델을 Onnx 모델로 만든 뒤 TensorRT 엔진을 생성할 수도 있다. 이렇듯 다양한 여러 프레임워크에서 TensorRT 를 이용하여, 정말 많은 방법으로 최적화가 가능하다.
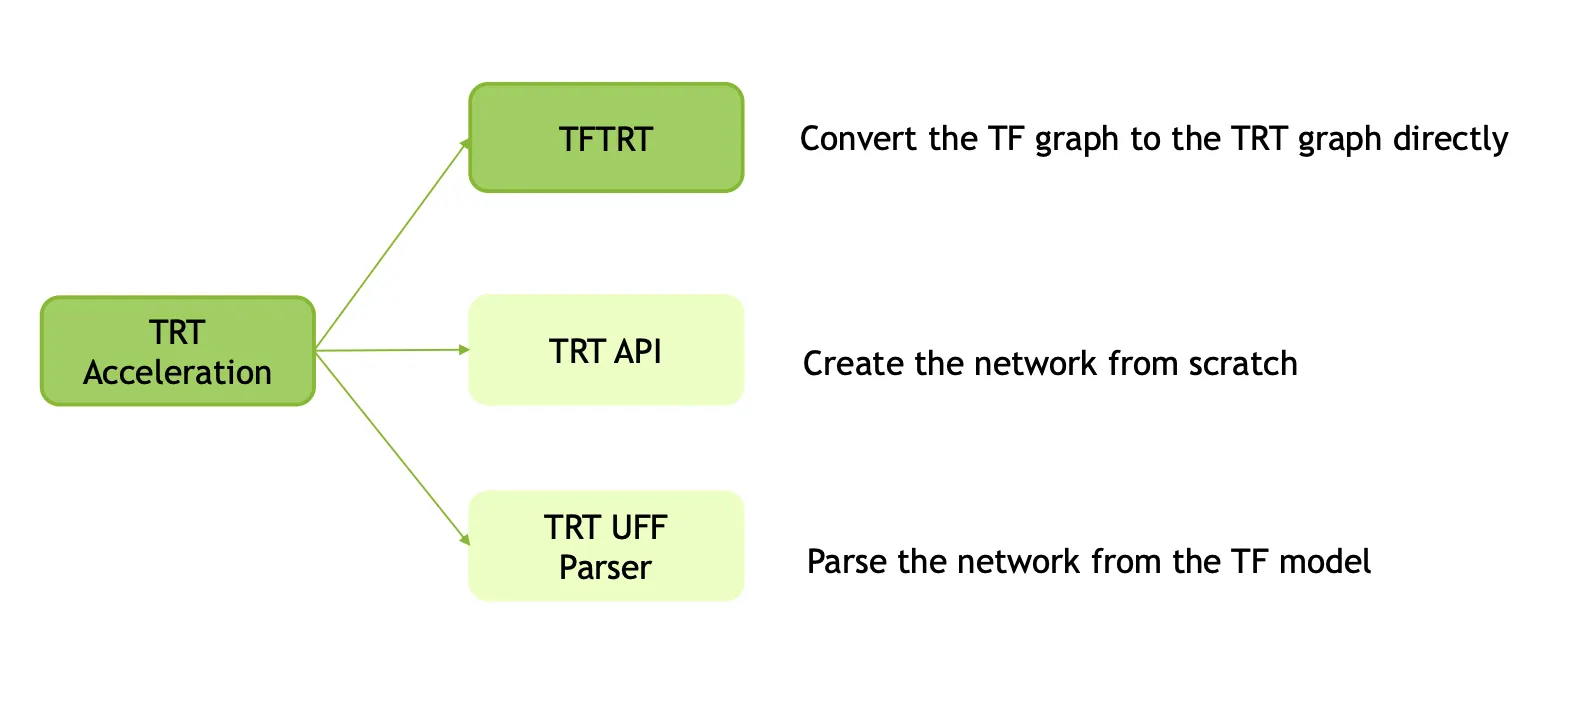
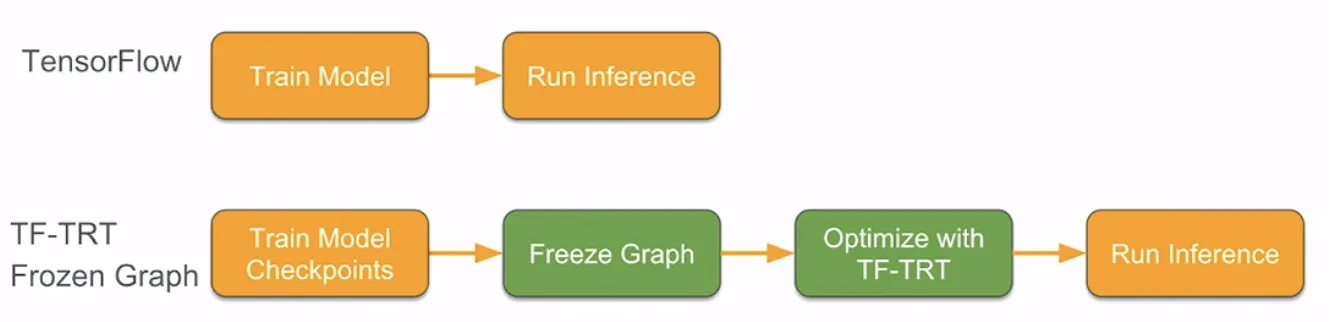
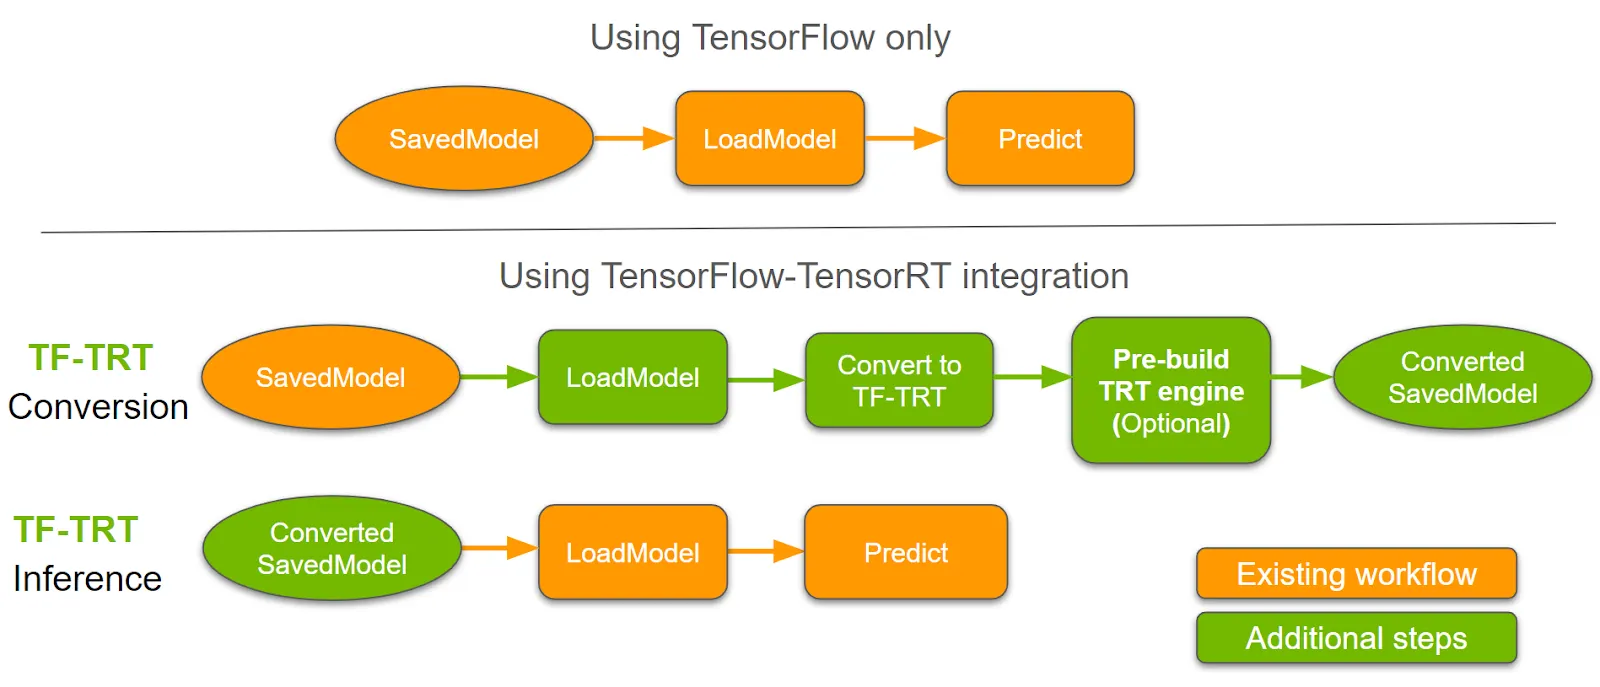
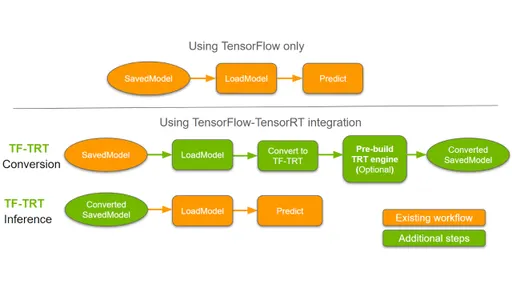
이렇게 생긴 그림에서, 2-1 부터 설명할 TF-TRT 는 진한 초록색으로 표시된 부분에 해당한다. TRT 를 사용하는 다양한 방법들 중tensorflow 와 함께 설치되는 tensorrt 만을 활용해서 NVIDIA 그래픽카드의 가속을 시도하는 방법일 뿐이다.
2-1. TF-TRT : TensorFlow and tensorRT
2-1-1. 버전 점검
우선 시작하기 전에 tensorflow 버전이 정말 다양하다는 것, 어느 버전이 먼저 나왔고, 나의 컴퓨터에는 어떤 버전이 설치되고 있는 것이고. 이런 내용들을 잘 점검하도록 하자. 핵심만 말하자면, tensorflow 는 1.7 버전부터 TF-TRT (tensorflow tensorrt) 라는 이름으로 tensorRT 를 tensorflow 프레임워크 안에 넣어서 사용할 수 있게 했다.
Tensorflow version 에 대한 것을 잘 모르면 진짜 뻘짓을 많이 하게 된다. 나는 2년간 tensorflow 1.15 가 1.7 보다 먼저 나온 (오래된) 버전인 줄 알았다. 하지만 https://www.tensorflow.org/versions 를 보면, 1.7 보다 1.15 가 최신 버전이다. 상식적으로 seven < fifteen 이니까... 1.7 과 1.1.5 의 비교가 아니라, 1.7 과 1.15 의 비교라는 것을 명심하자.
조금만 정보를 찾아보다 보면, 다음과 같은 사실을 알 수 있다.
tensorflow 1 의 최신 버전은 1.15.x 이다.
tensorflow 2 는 tensorflow 1 과 많은 차이가 있다.
버전을 확인하는 방법은 아래와 같다.
>>> import tensorflow as tf
>>> tf.__version__
'1.15.4'
Bash
복사
1.7 버전부터의 중요한 변화는 다음과 같다.
•
AVX 명령어 (CPU에서 제공하는 벡터 연산 instruction set architecutre) 지원
•
TensorFlow 내에 TensorRT 가 포함됨
2-1-2. (정확히 알기) TensorRT vs TF-TRT
함께 읽으면 좋은 자료 : Tensorflow 와 TensorRT 사이의 관계 및 의문들 + TF-TRT 로 추론 가속화하기

함께 읽으면 좋은 자료 : 나와 비슷한 부분 (똑같아 보이는 tensorrt 가 다른 API 로 사용한 예시가 여기저기서 보임) 에서 궁금증 + 버전에 대한 빡침을 해소해 준 질의응답 내용을 가져왔다. 아래 글을 읽으면 글을 쓴 사람이 어떤 부분에 빡쳐 있는지, 그 이유가 무엇인지는 물론 상당히 많은 배경지식들을 알게 될 수 있다.
Hi,I found that we can optimize the Tensorflow model in several ways. If I am mistaken, please tell me.
1- Using TF-TRT, This API developer by tensorflow and integreted TensoRT to Tensorflow and this API called as :from tensorflow.python.compiler.tensorrt import trt_convert as trtThis API can be applied to any tensorflow models (new and old version models) without any converting error, because If this API don't support any new layers, don't consider these layers for TensorRT engines and these layers remain for Tensorflow engine and run on Tensorflow. right?
2- Using TensorRT, This API by developed by NVIDA and is independent of Tenorflow library (Not integrated to Tensorflow), and this API called as:import tensorrt as trtIf we want to use this api, first, we must converting the tensorflow graph to UFF using uff-convertor and then parse the UFF graph to this API.In this case, If the Tensorflow graph have unsupported layers we must use plugin or custom code for these layers, right?
3- I don't know, when we work with Tensorflow models, Why we use UFF converter then TensorRT, we can use directly TF-TRT API, right? If so, Are you tested the Tensorflow optimization model from these two method to get same performance? what's advantage of this UFF converter method?
I have some question about the two cases above:
4- I convert the ssd_mobilenet_v2 using two cases, In the case 1, I achieve slight improvement in speed but in the case 2, I achieve more improvement, why?My opinion is that, In the case 1, The API only consider converting the precision (FP32 to FP16) and merging the possible layers together, But in the case 2, the graph is clean by UFF such as remove any redundant nodes like Asserts and Identity and then converted to tensorrt graph, right?
5- when we convert the trained model files like .ckpt and .meta, ... to frozen inference graph(.pb file), These layers don't remove from graph? only loss states and optimizer states , ... are removed?
I try to answer based on what I know.
1.
TF-TRT should have been co-developed by NVIDIA and Google TensorFlow team. Otherwise what you've stated looked right.
2.
Current releases of TensorRT support 3 kinds of "parsers": Caffe, UFF and ONNX. According to the "Deprecation of Caffe Parser and UFF Parser" paragraph in TensorRT 7.0.0 Release Notes, Caffe and UFF parsers are deprecated. ONNX parser is the preferred one going forward.
In order to optimize a TensorFlow model, you have the options of converting pb to either UFF or ONNX, and then to a TensorRT engine. In case there are layers in your model which are not supported (check this table) by TensorRT directly, you could either: (1) replace those layers with plugins; (2) don't include those layers when building the TensorRT engine, instead take TensorRT engine output and do postprocessing to complete the functions of those layers.
3.
There are pros and cons with TF-TRT.
Pros: API is easy to use; don't need to worry about plugins. (지원되지 않는 플러그인이 있으면 그냥 tensorflow 에서 실행되던 대로 그대로 로드해버리면 되니까.)
Cons: Need to store the whole TensorFlow library in HDD (a disadvantage for the deployment environment); need to load TensorFlow into memory at runtime; usually runs more slowly than pure TensorRT engine.
If you convert the whole model to TensorRT engine (binary) and plugins, you could load the engine with only TensorRT libraries ("libvninfer.so", etc.) on the deployment devices. In such a case, you don't need to install TensorFlow on the device at all. And the model would consume much less memory at runtime. This is a big advantage on embedded systems.
Theoretically, we could replace unsupported layers in ONNX with plugins as well. But NVIDIA doesn't seem to provide good examples about how to do that. I see a lot of people having problems in this regard on NVIDIA/TensorRT issues board. (이론상으로, tensorrt 지원 안되는 것들에 대해서 플러그인 꽂아넣을 수 있게 되어있긴 한데 예제도 많이 없다.)
4.
For "ssd_mobilenet_v2_coco", the UFF TensorRT engine runs much faster then the TF-TRT optimized graph for many reasons combined, I think:
•
Optimization done on the graph as a whole, not just on individual nodes or parts of the graph.
•
FP16 computation throughout the whole TensorRT engine, instead of (TF-TRT case) FP16 only on some optimized parts of the graph.
•
More efficient implementation of NMS, etc. (plugins implemented with CUDA kernels) instead of the original TensorFlow ops.
5.
I don't know the details about freezing a TensorFlow graph. But I think you are right. Nodes would not be deleted in the frozen graph. One other important aspect of freezing a TensorFlow graph is that "variables" (trainable weights) would be turned into "constants". So the frozen graph is no longer trainable.
따라서, 처음에는 이미 제공되는 모델을 TF-TensorRT 로 최적화하는 것 자체를 목표로 한다. 하지만 그래프 전체가 최적화될 경우 tensorRT 로 최적화하는 것의 성능이 더 우수할 수 있기 때문에, 충분히 일이 진행되고 모델의 성능이 괜찮다면 tensorRT 로 최적화되는 ops 로 전환하도록 하는 방향을 잡는다.
요약하자면, TensorRT 자체를 이용하여 엔진을 만들 수도 있지만 TensorFlow 1.7 버전 부터 포함된 TensorRT(TF-TRT)를 사용하여 엔진을 만들 수도 있다는 말이다. TF-TRT 가 아닌, TRT API 만을 활용해 모델을 최적화한다고 생각해 보자. 이때에는 TRT 엔진이 지원하지 않는 레이어가 있다면 에러를 내뿜고 더이상 최적화를 진행하지 않는다. 하지만 TensorFlow 에 내장된 TF-TRT 는 지원되지 않는 레이어가 있다 한들, 그를 무시하고 (tensorflow 연산으로 그대로 남겨두고) 나머지만을 최적화 시켜준다. 물론 TensorRT 노드로 모든 레이어들을 대체했을 때만큼의 효과를 제대로 누릴 수 없다는 점이 있다. 하지만, 그렇게 모든 연산을 다 정의해주어야 하는 TensorRT 그 자체 API 만을 사용하는 것은 TF-TRT 보다 훨씬 번거롭기 때문에, (TensorFlow 1.14 기준! / 2.0 버전은 바뀌었을지도 모른다는 생각이...) 이 글에서는 TF-TRT 을 위주로 다룬다.
1.7 이상 1.13.x 이하의 TF-TRT 호출은 윗줄을 쓴다.
1.14.x 이상의 TF-TRT 호출은 아랫줄을 쓴다.
from tensorflow.contrib.tensorrt import trt_convert as trt # tensorflow 1.7 <= version <= tensorflow 1.13.x
from tensorflow.python.compiler.tensorrt import trt_convert as trt # tensorflow 1.14.x <= version <= tensorflow 1.15.x
Python
복사
TF-TRT 가 존재하지 않던 시절 TensorRT Python API 는 pip 패키지 매니저로 설치하므로 이렇게 호출한다.
import tensorrt as trt # trt engine only
Python
복사
2.x 의 TensorRT 호출은 는 다음과 같다.
from tensorflow.python.compiler.tensorrt import trt_convert as trt
Python
복사
보다시피 tensorflow 프레임워크와 함께 깔린다는 것을 알 수 있다.
2-2. how to use TF-TRT
2-2-1. TensorFlow 저장 모델의 종류
실질적으로 사용하는 방법을 알기 전에, tensorflow 모델의 저장 형식들을 알아볼 필요가 있다. 관련 내용은 아래를 참고하자. savedmodel, checkpoint, frozen graph 등을 모두 이해하고 있어야 한다.
2-2-2. TF-TRT API
본문에서 우리는 tensorflow 1 과 tensorflow 2 에 차이가 있다는 사실을 알았으니, 두 경우에 실제로 연산을 수행하는 방법에도 차이가 있다는 것을 알 것이다.
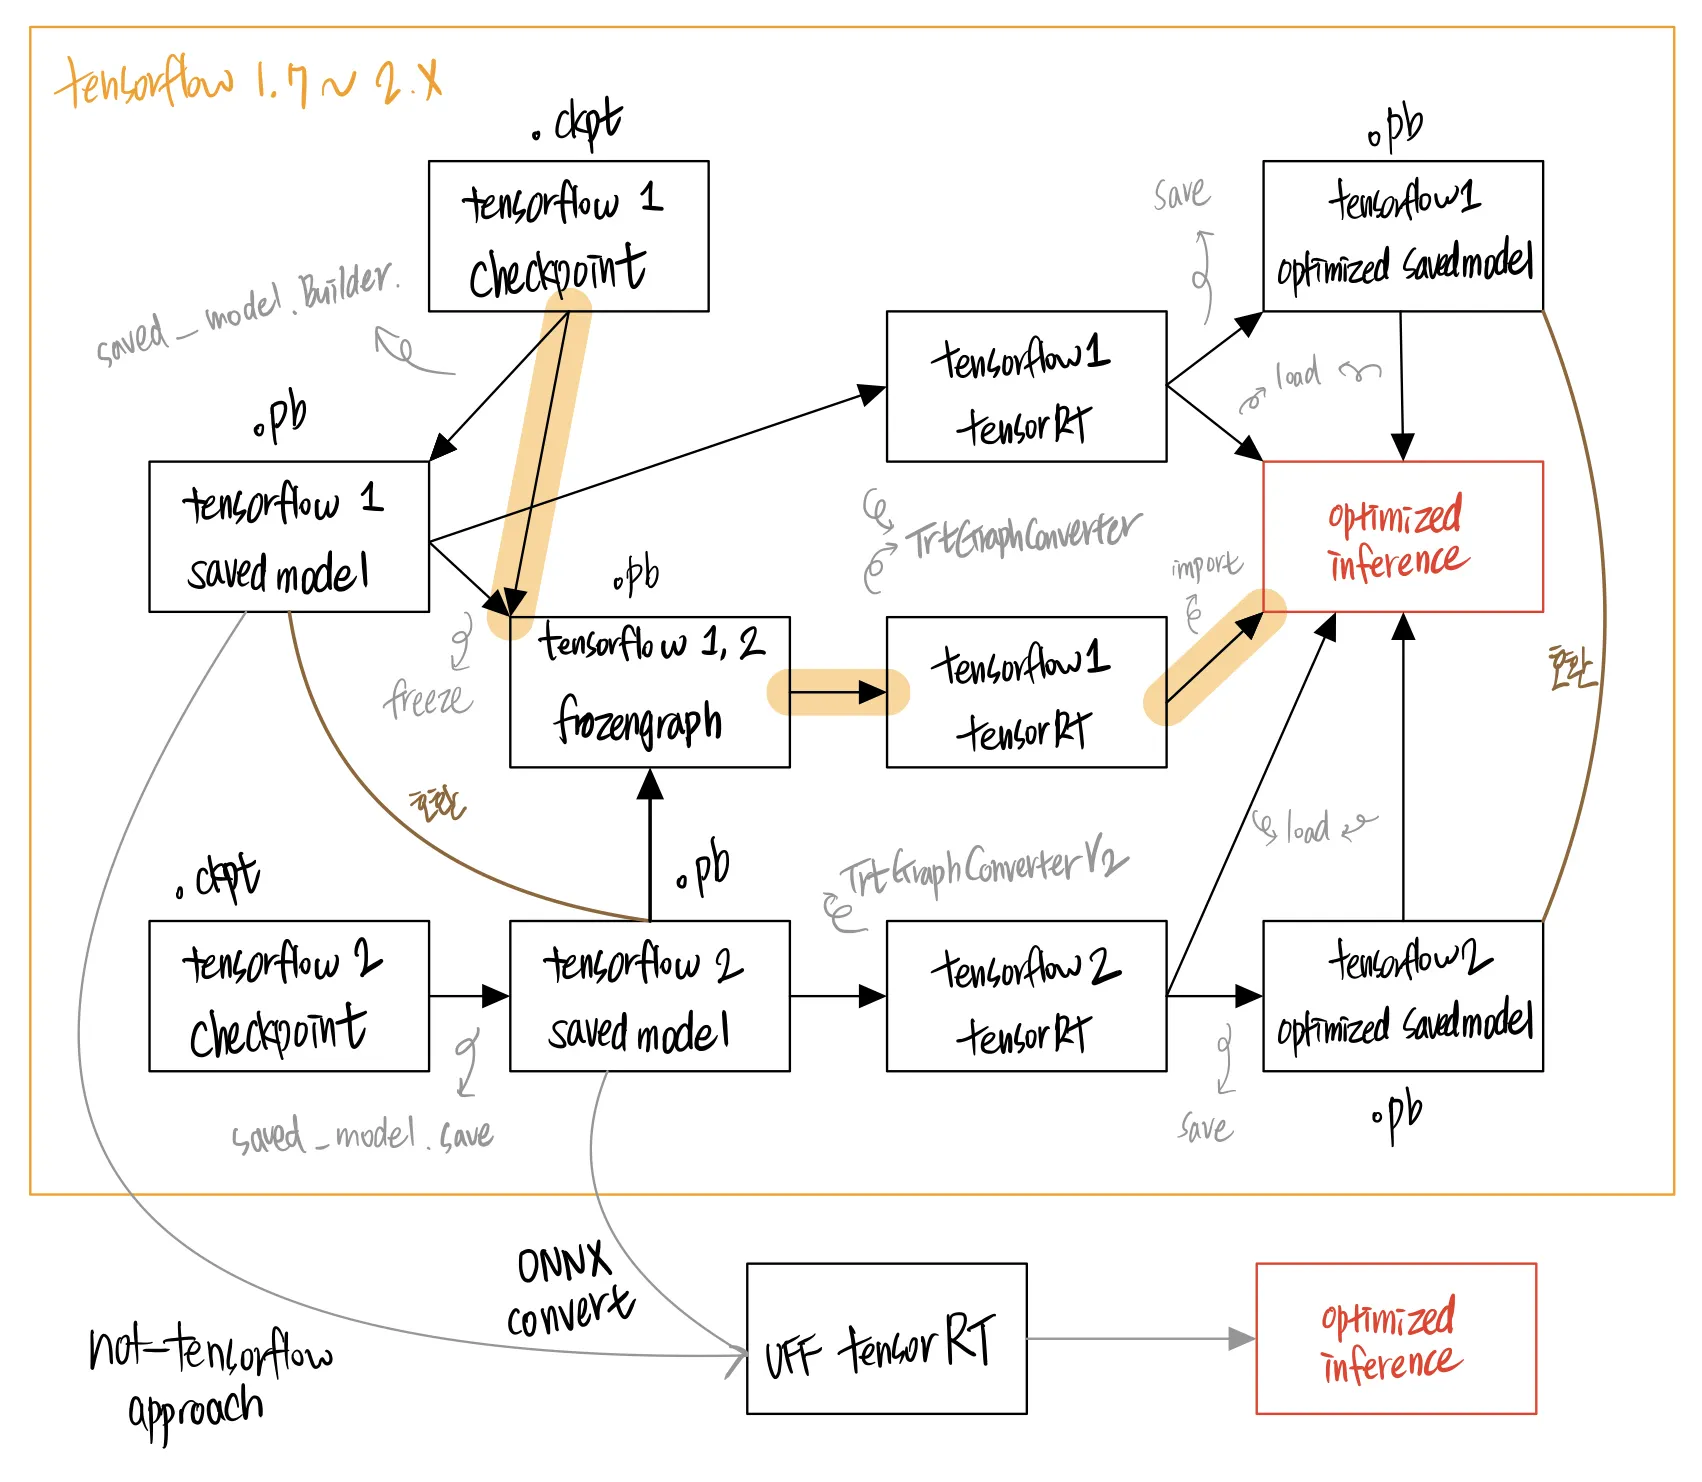
그래서 그림을 그렸다! 아래 그림에서는 어떤 형태에서 어떤 과정을 통해 최적화를 수행할 수 있는지 모든 경우의 수들을 보여 준다. NVIDIA 공식 documentation 에는 이것들이 잘 서술되어 있지 않아서 삽질을 하기 일쑤였다.
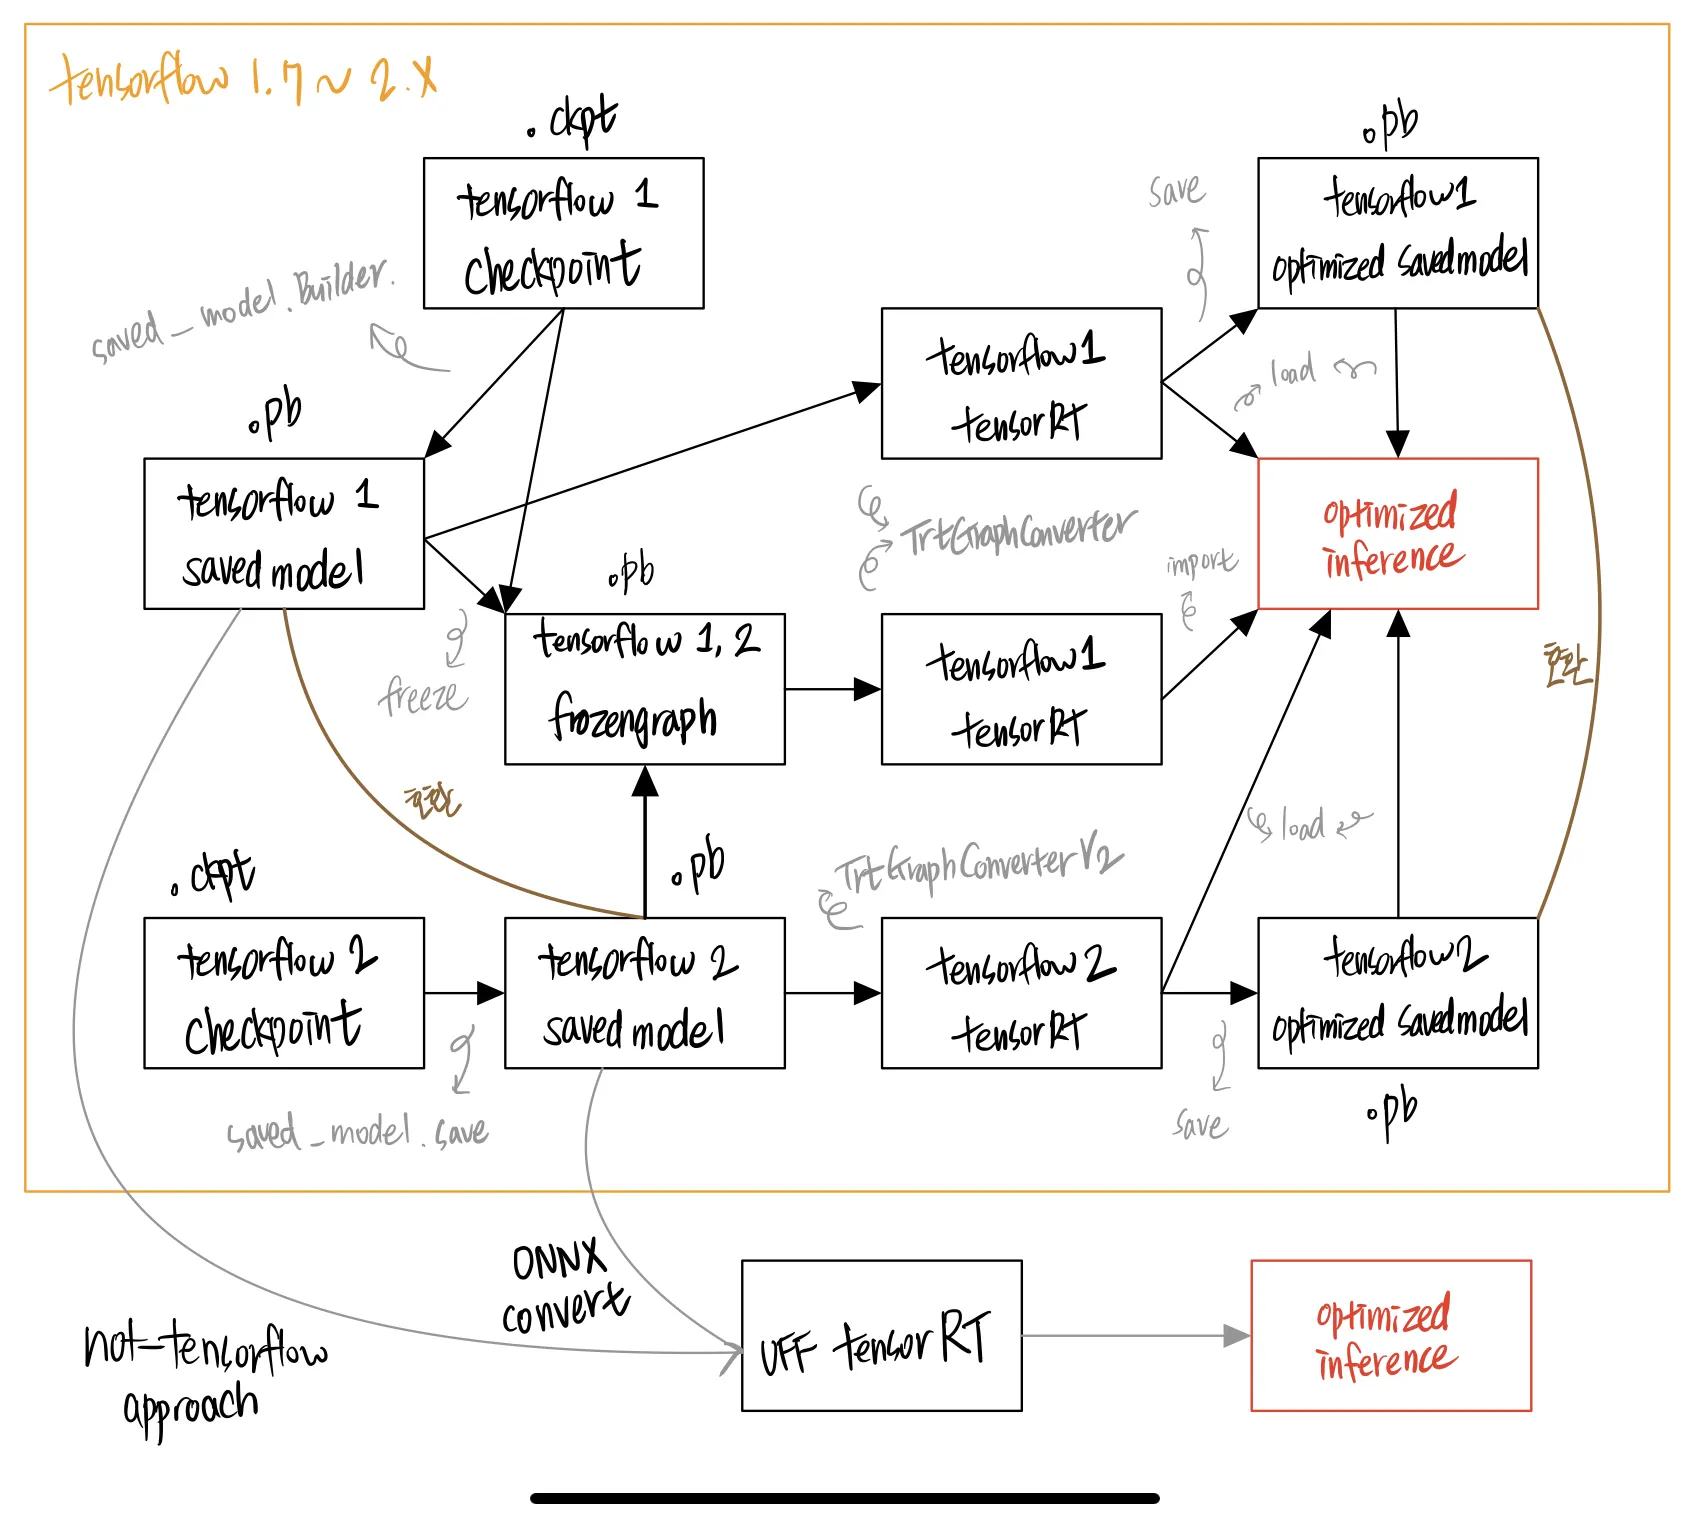
삽질을 줄이기 위해 위 그림을 보고 이것에 대해 답변을 해 보자. 내가 가장 헤매던 부분이기도 하다.
•
tensorflow 1 의 frozengraph 는 optimized savedmodel 로 미리 변환을 해 두고, 이것을 불러와서 최적화된 모델 연산을 수행할 수 없다.
•
tensorflow 1 frozengraph, optimized savedmodel, savedmodel 은 모두 파일 확장자가 동일하다.
•
tensorflow 2 API 는 frozengraph 를 통해 tensorRT 로 최적화된 모델 연산을 수행할 수 있다.
정답
•
O
•
O
•
X
일반적으로 TensorRT 를 검색하면 접할 수 있는 아래와 같은 그림들은, 내가 그린 그래프의 부분집합이다.
TensorFlow 1

TenosrFlow 1
TensorFlow 2. Note that in TensorFlow 2.x, TF-TRT only supports models saved in the TensorFlow SavedModel format.
TensorFlow 1 TF-TRT Frozen Graph
TenosrFlow 1 TF-TRT SavedModel


함께 읽으면 좋은 자료 : 본문 내용 출처 및 공식 API 문서
위 그래프에서 보듯이 정말 많은 방법들이 존재한다. 이 문서에서는 몇몇 케이스들을 소개하고자 한다.
이 문서에서는 tensorflow 1 (1.15.x, TF1 최종 버전) 과 tensorflow 2.x 을 기준으로 설명한다.
2-2-3. TensorFlow 1 TFTRT 최적화 - 큰그림
import tensorflow as tf
from tensorflow.python.compiler.tensorrt import trt_convert as trt
Python
복사
주의사항
공식 API 에서는 개대충되어있는데
실상은 ㄹㅇ 파라미터 다넣어줘야함. 엔비디아!!!!!!!!!!!!!!! 나쁜놈!!!!
아오.. 이것때문에 진짜 고생했다.
tensorflow 1 TFTRT 최적화 과정 2 : checkpoint → frozenmodel → optimize
tensorflow 1 TFTRT 최적화 방법 1 : FP32, FP16
tensorflow 1 TFTRT 최적화 방법 2 : INT8
# 이 model 은 default graph에 노드로 들어갈 것입니다.
model = tf.keras.models.load_model('modelname/1/')
Python
복사
(2-2) case : tensorflow metagraph 와 data 를 가져오는 경우
graph_1 = tf.Graph()
with graph_1.as_default():
if graph_1 is tf.get_default_graph():
print('True')
with tf.Session(graph=graph_1) as sess: # 그래프 연산에 필요한 컴퓨팅 자원 연결
saver = tf.train.import_meta_graph('modelname/1/mymodel-1000.meta')
# 이 op는 default graph에 노드로 들어갈 것입니다.
saver.restore(sess, 'modelname/1/mymodel-1000')
Python
복사
(2-3) case : 여러 개의 tensorflow graph 를 가져오려고 하는 경우
graph_1 = tf.Graph()
graph_2 = tf.Graph()
sess_1 = tf.Session(graph=graph_1)
sess_2 = tf.Session(graph=graph_2)
with graph_1.as_default():
if graph_1 is tf.get_default_graph():
print('True')
# 이 op는 default graph에 노드로 들어갈 것입니다.
saver = tf.train.import_meta_graph('modelname/1/mymodel-1000.meta')
saver.restore(sess_1, 'modelname/1/mymodel-1000')
with graph_2.as_default():
if graph_2 is tf.get_default_graph():
print('True')
# 이 op는 default graph에 노드로 들어갈 것입니다.
saver = tf.train.import_meta_graph('modelname/1/mymodel-2000.meta')
saver.restore(sess_2, 'modelname/1/mymodel-2000')
Python
복사
(3) parameter 및 TF-TRT 변환
(3-1) case : default parameter 을 변경하여 적용하는 방법
# define parameter
conversion_params = trt.DEFAULT_TRT_CONVERSION_PARAMS._replace(precision_mode=trt.TrtPrecisionMode.FP16,
max_workspace_size_bytes=8000000000)
# define converter
converter = trt.TrtGraphConverter(input_saved_model_dir='path/modelname/1/',
conversion_params=conversion_params)
# convert
converter.convert()
converter.save(output_saved_model_dir='path/modelname_saved_model_TFTRT_FP16/1/')
Python
복사
(3-2) case : converter 을 정의해서 사용하는 방법
# define parameter
# define converter
converter = trt.TrtGraphConverter(input_saved_model_dir='path/modelname/1/',
precision_mode='FP16',
is_dynamic_op=False
max_batch_size=1
max_workspace_size_bytes=(11<32),
)
# convert
converter.convert()
converter.save(output_saved_model_dir='path/modelname_saved_model_TFTRT_FP16/1/')
Python
복사
(3-3) case : 바로 inference graph 로 만들어버리는 방법
trt 로 생성한 graph 가 default_graph 가 되는 것이 아니고, graph 가 return 된다.
trt_graph = trt.create_inference_graph()
Python
복사
최적화 방법 2 : tensorflow 의 .pb frozenmodel → parsing → TF-TRT 로 최적화 → 실행
(3) pb 파일 얼리기 (freeze) - 그래프를 고정하여 더 이상 학습이 안 되도록 모델의 구조와 가중치 결합
(4) frozen pb 파일을 불러와서 parsing
(5) parameter 및 TF-TRT 변환
2-2-4. TensorFlow 2 TFTRT 최적화 - 큰그림

2021년 6월 3일 기준, Google COLAB 에서는 TF-TensorRT 가 정상적으로 작동하지 않는다.
내가 그렸던 그림에서 볼 수 있듯, TensorFlow2 의 경우에는 TensorFlow1 보다 훨씬 경우의 수가 적다는 것을 알 수 있다. 그래서, 코드로 보았을 때 아래와 같이 크게 네 부분으로 나눌 수 있다. 아래 기본 코드에서 특정 부분이 추가되고 말고의 문제가 된다.
(1) TensorFlow2 Savedmodel 을 TensorRT 최적화 모델로 변환할 컨버터 정의하기
import tensorflow as tf
from tensorflow.python.compiler.tensorrt import trt_convert as trt
conversion_params = trt.TrtConversionParams(...)
converter = trt.TrtGraphConverterV2(
input_saved_model_dir=input_saved_model_dir,
conversion_params=conversion_params)
Python
복사
(2) TensorRT 변환하기
converter.convert()
Python
복사
(3) TensorRT로 최적화된 TensorFlow2 Savedmodel 저장하기
converter.save(output_saved_model_dir)
Python
복사
(4) Savedmodel 형식으로 저장된 파일 불러오고, Signature 사용해서 추론하기
saved_model_loaded = tf.saved_model.load(
output_saved_model_dir,
tags=[tag_constants.SERVING])
graph_func = saved_model_loaded.signatures[signature_constants.DEFAULT_SERVING_SIGNATURE_DEF_KEY]
output = graph_func(input_data)["output_0"].numpy()
Python
복사
2-2-5. TensorFlow 1, 2 TFTRT 최적화 - 작은 그림
속도, 성능, 메모리와 관련 : Precision Mode
글의 상단에 간단히 소개했던 양자화에 대한 내용이다.
TensorRT 는 모델이 원래 어떤 자료형을 지원했든 상관없이, 텐서와 가중치를 더 낮은 정밀도로 변환시켜 최적화할 수 있다. precision_mode 라는 옵션에 지정해줄 수 있다. NVIDIA 에 따르면, FP16 을 가장 권장한다고 하고, INT8 은 - 실험해보고 나서도 별로 차이가 없다고 판단되면 사용하라고 한다.
속도, 메모리와 관련 : TensorRT 의 Mode, TensorRT Engine 캐싱 (Caching)
TensorFlow 의 TensorRT 최적화기 에는 두 가지 모드가 있다.
•
Dynamic : 런타임에 계속 TensorRT Engine 이 빌드된다.* (와 이게 런타임에 되는게 가능한가..). 만약, dimension 이 None 이거나 -1 같이 undefined 된 그래프에 대해서 사용한다면 이 모드를 사용해야 한다. 8비트 정수형 양자화 (post-training quantization - int8 calibration) 하는 경우에는 이 모드를 사용해야 한다. (왜지?) TensorFlow2 TRT Converter 은 Dynamic mode 를 기본적으로 지원한다.
•
Static : 런타임에 계속 빌드되는 것이 아니라, 처음에 TrtGraphConverter.convert 같은 함수를 사용할 때 빌드된 이후 고정돼 버린다. undefined 된 그래프에 대해서 이 변환을 시도하면 Input shapes must be fully defined when in static mode. Please try is_dynamic_op=True. 같은 오류를 내뿜을 것이다. TensorFlow2 TRT Converter 은 Static mode 를 지원하지 않는다.
2021년 5월 <TensorFlow 2.4 Keras Model> + <TenosrFlow 1.15 TF-TRT> 기준, YOLO v4 모델을 Dynamic mode 로 실행해 보았을 때의 경험에 따르면, bounding box 의 추론결과에 따라 TensorRT Engine 이 다시 빌드되며 모델 추론이 중지되고 빌드를 하게 되는 경향이 있었다. 물론 어떠한 정보도 사전에 받은 적 없는 첫 번째 추론에도 오랜 시간이 걸리는 것이 사실이다. 이렇게 Dynamic 한 경우를 표현하는 것이 불가능하도록 막아버리는 것에 비한다면 훨씬 유연한 것은 사실이지만, 어쨌든 다시 빌드하는 것에 latency 가 약간 있다. 이것은 알고리즘 중단에 대한 위험이 높은 실시간 추론에 있어서 큰 문제가 될 수 있다.
이 경험을 통해 알 수 있듯, TensorRT 는 static 그래프 사용을 권장한다. build 에 무조건 오버헤드가 있을 수 밖에 없다. 새로운 shape 이 들어왔을 때에는, 그 shape 에 맞도록 다시 최적화된 TRTEngine 을 만들어야 하기 때문이다. 여기서 의문이 하나 풀린다. 왜 TrtGraphConverter.conversion_params 에는maximum_cached_engines 이 존재하는가!
NVIDIA Documentation 을 인용하자면,
The argument maximum_cached_engines can be used to control how many engines will be stored at a time, for each individual TRTEngineOp in the graph.
이라고 나와 있다. 나의 yolo 와 같은 상황에서 만약 cached_engine 이 기본값인 1 이라면, output shape 이 예를 들어 [1, ?, 40, 3] 이라고 쳤을 때, ? 가 바뀔 때마다 새로 TRTEngine 을 만들게 된다는 이야기이다. 그러므로, GPU 메모리만 넉넉하다면, 이 값은 넉넉하게 설정해 두고, 나올 수 있는 경우의 수가 10개라면, 이것도 10개로 설정해 두는 것이 좋다. 한발짝 더 들어가면, 이때 cached 된 TRT Engine 이 대체되는 정책은 LRU (Least Recently Used) 이므로, 최근에 그러한 shape 이 나타나는 경우가 몇 없다가 한번 걸리면 엄청난 오버헤드가 나타날 수 있다는 사실을 명심하자.
속도와 관련 : 덩어리의 크기 설정
minimum_segment_size 라는 옵션을 통해 설정할 수 있는 이 부분은, 하나의 TensorRT Engine 에 얼마나 많은 수의 operator 을 포함시킬 것인지를 설정할 수 있다. 만약 그래프가 너무 많은 수로 나누어져 있다면 마찬가지로 연산 덩어리들 사이를 오가는 데 오버헤드가 있을 것이다. 그렇기 때문에 굉장히 단순히 생각하면 하나의 TensorRT Engine 에 많은 노드가 포함되면 포함될수록 더 좋은 성능을 낼 것이다.
하지만 당연히 그렇게 된다면 좋지 않은 점도 있다. 더욱 디테일하게 최적화될 가능성을 포기해 버리고, 하나의 커다란 덩어리로 만들어버리는 현상이 발생할 수 있기 때문이다. 크게 최적화할거냐 작게 최적화할거냐를 TensorRT 에게 맡기는 것이기 때문에, 이것도 하이퍼파라미터가 된 것이다.
속도, 메모리와 관련 : 메모리 제어
•
TensorRT 는 가중치와 활성화값들* 들 (weights and activations)을 GPU 에 저장한다. TensorRT stores weights and activations on GPUs.
•
이것을 제어하기 위한 변수가 max_workspace_size_bytes 이다.
이때 또한 하기 쉬운 오해가, max_workspace_size_bytes 을 설정하면, 전체 GPU 사용량을 한방에 제어할 수 있으리라 생각하는데 그것이 아니다. 이 내용을 정확히 짚고 넘어갈 필요가 있다. TensorRT Engine 은 TensorFlow Workspace 내부에서 (원문참고2) 일부 작업을 처리하기 위해 별도의 메모리를 요구하고, TensorFlow Workspace 내부에서 최대로 사용할 수 있는 메모리의 사이즈를 관리하는 파라미터가 바로 max_workspace_size_bytes 이다.
예를 들어, 만약 TensorFlow Session 의 메모리 크기를 6GB 로 제한 (e.g. tf.config.experimental.set_virtual_device_configuration 등을 통한 TensorFlow 에서 단일 GPU 메모리 사용량을 제한하는 코드 스니펫 을 참고하자.) 하고, TF-TRT API 에서 max_workspace_size_bytes 를 2GB 로 제한한다면 결론은 아래와 같다.
1. 런타임에 6GB 의 GPU 메모리가 할당받는다. (원문참고2)
2. TensorFlow model 은 4GB~6GB 를 사용한다. (원문참고2)
3. TensorRT cached engine (~= size of the weights, 원문참고1) 은 0GB~2GB 를 사용한다. (원문참고4)
4. TensorFlow model + TensorRT cached engine (원문참고1)
참고
1.
The size of each engine stored in the cache of TRTEngineOp is about the same as the size of weights.
2.
TensorRT allocates memory through TensorFlow allocators, therefore, all TensorFlow memory configurations also apply to TensorRT. For example, if the TensorFlow session configuration config.gpu_options.per_process_gpu_memory_fraction is set to 0.3, it means 30% of the GPU memory is allocated by TensorFlow to be used for all of its internal usage including TF-TRT and TensorRT. That means if TensorRT asks TensorFlow to allocate memory with the amount more than what is available to TensorFlow, then it will run out of memory.
3.
On top of the memory used for weights and activations, certain TensorRT algorithms also require temporary workspace. The argument max_workspace_size_bytes limits the maximum size that TensorRT can use for the workspace. The default value is 1GB. If the value is too small, TensorRT will not be able to use certain algorithms that need that much workspace and that may lead to poor performance. The workspace is also allocated through TensorFlow allocators.
4.
Although TensorRT is allowed to use algorithms that require at most max_workspace_size_bytes amount of workspace, but the maximum workspace requirement of all the TensorRT algorithms may still be smaller than max_workspace_size_bytes (meaning, TensorRT may not have any algorithm that needs that much workspace). In such cases, TensorRT only allocates the needed workspace instead of allocating how much the user specifies.
5.
If you observe your inference running out of memory or you want to experiment with whether you can get better performance by using more memory, then try to increase config.gpu_options.per_process_gpu_memory_fraction and max_workspace_size_bytes. The memory usage highly depends on your model and it’s hard to predict a suitable default for max_workspace_size_bytes.
활성화 (Weights and Activations) 값들을 정확히 어떻게 이해해야 하는지는 잘 모르겠다. 아마도, input 이 연산되며 계산되어 나오는 부산물들이 아닐까 싶긴 한데, 어쨌든 정확히는 잘 모르겠다. 그래서 앞으로는 원문 그대로 weights and activations 으로 표기하겠다.
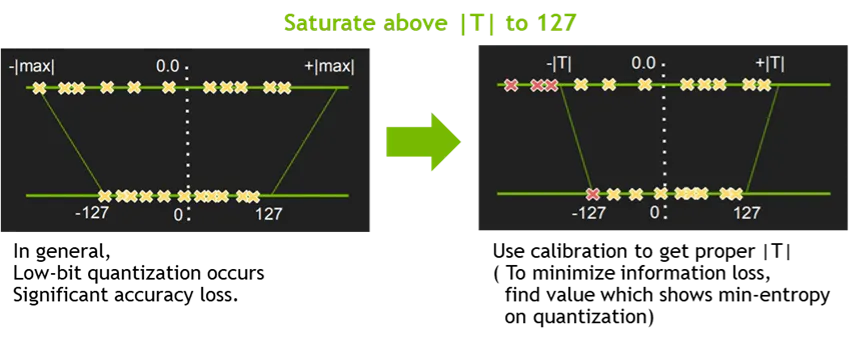
속도, 성능, 메모리와 관련 : INT8 캘리브레이션과 내장 TensorRT Calibration
•
당연히 INT8 양자화를 수행한다면 weights and activations 을 GPU 에 8bit integer 형태로 저장을 해야 하므로, weights and activations 에서 처리되는 Float 값들을 적절한 범위로 변환해야 한다.
•
모델을 학습시킨 뒤 수행하는 이 과정을 post-training calibration 이라고 부른다. 이 범위를 맞춰 주는 알고리즘은 다양한 것들이 있다. 그런 알고리즘들을 사용한 뒤 TensorRT 모델에 넣어 주어도 된다. 그것과 별개로, TensorRT 에도 이 캘리브레이션 알고리즘이 내장되어 있다. 다른 것들을 사용하는 것이 까다로우면 이것을 사용해도 된다.
[TODO]
등등
알아두면 좋은 참고 : Runtime 에 기다리는 시간 줄이기
TensorFlow blog 의 원문을 인용해 보자.
그리하여 build() 와 save() 가 포함된 워크플로우는 아래와 같다. TensorFlow 2 기반 예시코드이다.
from tensorflow.python.compiler.tensorrt import trt_convert as trt
# Conversion Parameters
conversion_params = trt.TrtConversionParams(
precision_mode=trt.TrtPrecisionMode.<FP32 or FP16>)
converter = trt.TrtGraphConverterV2(
input_saved_model_dir=input_saved_model_dir,
conversion_params=conversion_params)
# Converter method used to partition and optimize TensorRT compatible segments
converter.convert()
# Optionally, build TensorRT engines before deployment to save time at runtime
# Note that this is GPU specific, and as a rule of thumb, we recommend building at runtime
# This argument is a generator function that yields input data as a list or tuple.
converter.build(input_fn=my_input_fn)
# Save the model to the disk
converter.save(output_saved_model_dir)
Python
복사
*주석이 나타내듯 input_fn 옵션에 들어가는 값은 제네레이터 함수이다.
INT8 양자화가 추가되면 워크플로우는 아래와 같다.
from tensorflow.python.compiler.tensorrt import trt_convert as trt
conversion_params = trt.TrtConversionParams(
precision_mode=trt.TrtPrecisionMode.INT8)
converter = trt.TrtGraphConverterV2(
input_saved_model_dir=input_saved_model_dir,
conversion_params=conversion_params)
# requires some data for calibration
converter.convert(calibration_input_fn=my_input_fn)
# Optionally build TensorRT engines before deployment.
# Note that this is GPU specific, and as a rule of thumb we recommend building at runtime
# This argument is a generator function that yields input data as a list or tuple.
converter.build(input_fn=my_input_fn)
converter.save(output_saved_model_dir)
Python
복사
이 build(), save() 는 TensorFlow 2 에서 잘 작동한다. TensorFlow 1 에서 실행했을 때 상당히 이슈가 많았던 것으로 기억한다. TensorFlow 1 모델을 변환하는 것에 대해서 경험이 있는 사람은 comment 를 남겨 주면 좋겠다.
2-3. (심화) 8 bit INT quantization Issue
8 bit int 자료형의 quantization issue 들에 대해서 정리된 내용을 메모했다.
그리고 캘리브레이션 데이터셋이 필요한 이유에 대해서 간단히 설명한다.
2-3-1. 특징1 : Linear Quantization without bias
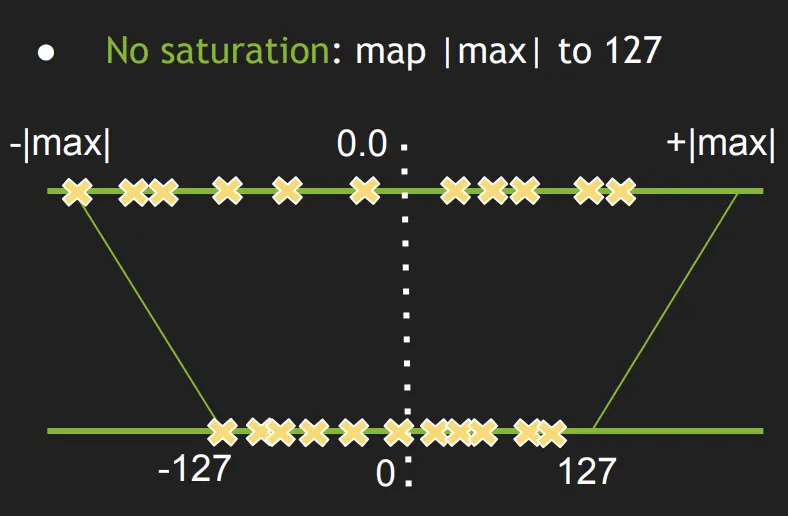
2-3-2. 특징2 : Thresholding + Linear Quantization without bias
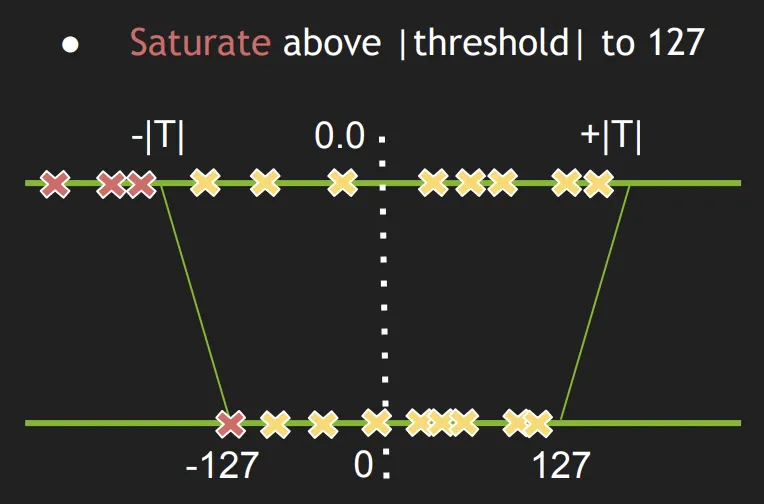
2-3-3. 특징3 : Thresholding TradeOff
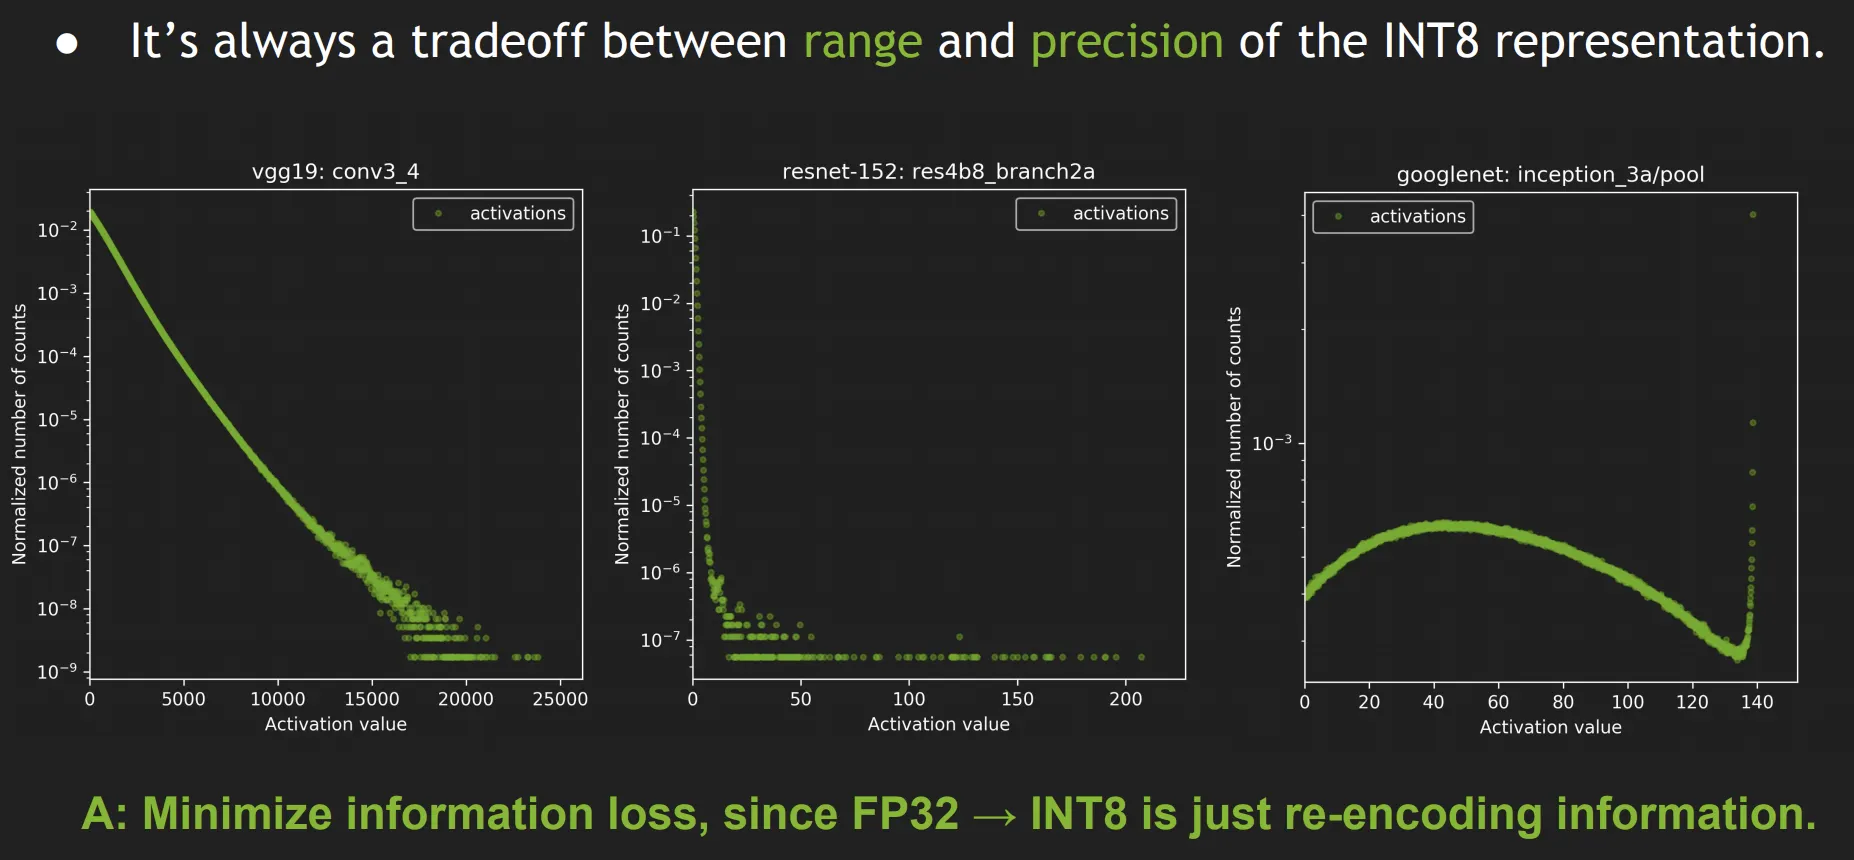
•
INT8 model encodes the same information as the original FP32 model.
•
We want to minimize loss of information.
•
Loss of information is measured by Kullback-Leibler divergence (AKA
relative entropy or information divergence).
•
Intuition: KL divergence measures the amount of information lost when
approximating a given encoding.
2-3-4. Solutions
•
우선 Run FP32 inference on Calibration Dataset
•
그러면서 모든 레이어마다
◦
collect histograms of activations.
◦
generate many quantized distributions with different saturation thresholds
◦
pick threshold which minimizes KL_divergence
•
Entire process takes a few minutes on a typical desktop workstation
Calibration dataset 의 요구조건
•
Representative
•
Diverse
•
Ideally a subset of validation dataset.
•
1000s of samples
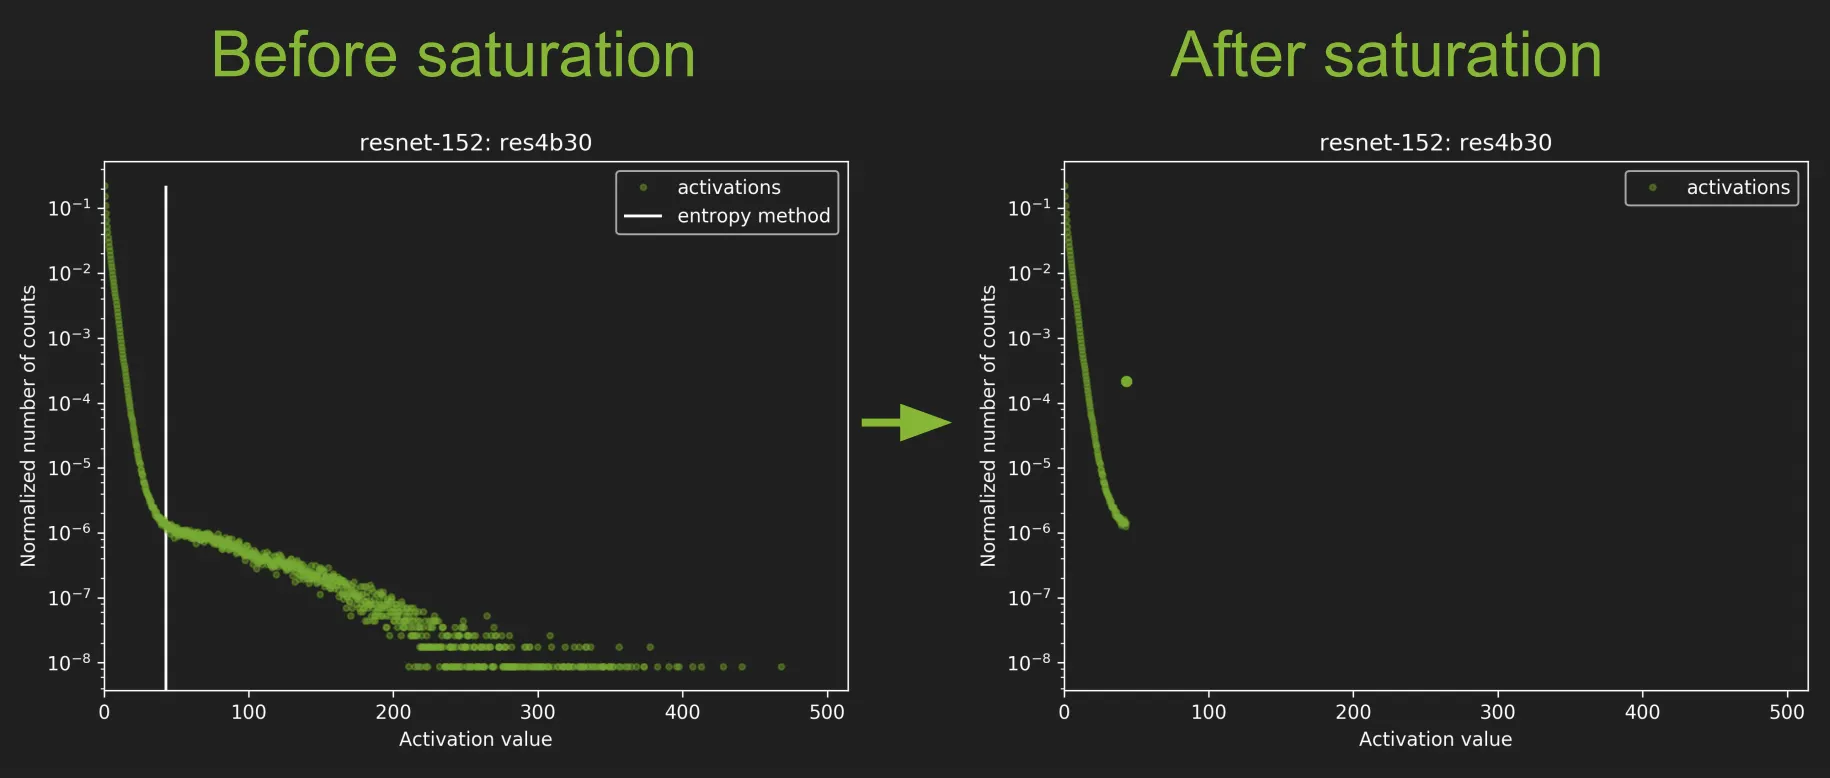
저렇게 만든 다음에 저걸 0~255 범위로 펼쳐 놓겠지.
메모장
함께 읽으면 좋은 자료 : Tensorflow 와 TensorRT 사이의 관계.


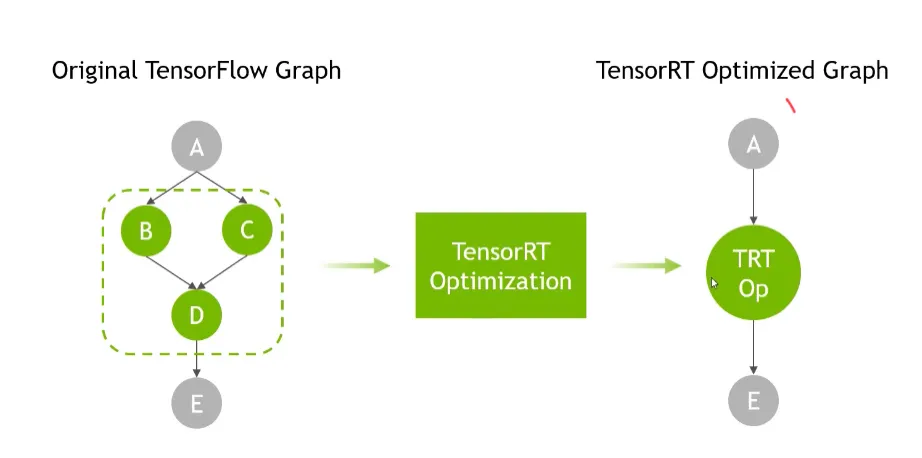
The integrated solution then applies TensorRT optimizations to the subgraphs supported by TensorFlow. The output is a TensorFlow graph with supported subgraphs replaced with TensorRT optimized engines executed by TensorFlow.
tf.import_graph_def(graph, name='name')
Python
복사
그래프 하나가 그려진 도화지 가져오기 : Imports the graph from graph_def into the current default Graph. tensorflow 는 기본적으로 default Graph 에서 작업하는데 default Graph 로 가져오겠다는 것. 즉, tensorflow 가 보고 있는 도화지를 내가 가져온 도화지로 대체하겠다는 것.
tf_sess = tf.Session(config=tf_config)
Python
복사
참고한 자료 : 이대로 돌아가지는 않지만, 코드 작성에 많은 아이디어를 줌.
NVIDIA TF-TRT 강의노트

기타
오오오 머지됐다 핵신기하누...