그림 (참고1)
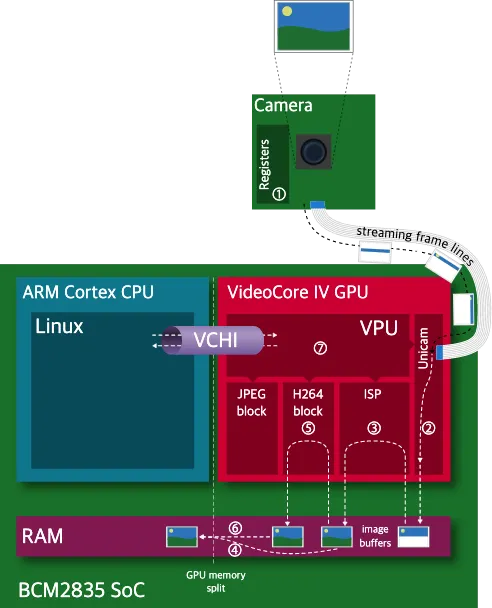
카메라 모듈 내의 레지스터에서 구간화(binning), 수평방향 뒤집기(horizontal flip), 수직방향 뒤집기(vertical flip), 일부분 무시하기(line skipping) 같이 기본적인 연산들을 수행한다 (1:Registers). 특히 구간화는 디지털 신호로 변환되는 과정을 거치기 전에 수행되어 노이즈를 줄여 주는 데 큰 역할을 한다. 이렇게 한 번 카메라 자체 레지스터에서 처리된 1개의 행 픽셀값들이 케이블을 통해 스트리밍되어 GPU 의 CSI-2 인터페이스로 이동한다. Unicam component 는 이 1개의 행에 해당하는 조각을 RAM 에 쓰게 된다 (2:Unicam→RAM). 이러한 조각들을 모아 주고( ‣ Assembling complete frame buffers from these lines), 다양한 후처리를 해준 뒤 다시 RAM 에 넣어주는 것은 온전히 ISP(3:Image Signal Processor)의 몫이다 (언뜻 언젠가 컴퓨터구조, 임베디드 수업에서 많은 스마트폰 제조사들의 사진의 색감이나 화질들이 다른 것은 이 ISP 의 영향이 크다고 하셨던 교수님의 말씀이 떠올랐다. Iphone 의 ISP SW 가 굉장히 뛰어나다고.) (참고2).
ISP 가 하는 후처리의 종류는 굉장히 다양하다. Digital gain 값을 bayer pattern 에 적용하여 디지털화된 값을 증폭시키는 것 (참고4) 이나 화이트밸런스 (참고5), 렌즈왜곡 (참고6) 제거, 샤프닝 (참고7), 밝기, 대비, 채도조절, 해상도조절 (참고8:맨 마지막에 수행되는 해상도조절), 색상처리처럼 우리에게 잘 알려진 연산들은 대부분 이 단계에 해당한다 (참고3:이렇게 유명한 것들 외 ISP 가 수행하는 작업들에 무엇이 있는지 확인해 보자).
이렇게 ISP 블럭을 지나 RAM 에 다시 적재된 데이터는 영상의 행 파편이 아니라 완전한 영상의 형태라고 할 수 있다. 이때 영상의 포맷은 우리가 흔히 알고 있는 RGB 형태일수도 있고, YUV 형태일수도 있다. 우리는 평소 RGB 형태의 정보를 행렬 형태로 읽어들여 다양한 작업을 한 경험이 있지 않은가! 드디어 반가운 데이터 포맷을 마주할 수 있는 순간이다. 우리가 picamera api 의 capture() 과 같은 계열의 영상 취득 메서드를 통해 단순히 단일 영상을 얻고자 한다면, DMA 를 통해 (참고11:DMA 와 영상 요청에 대한 callback 과정) CPU RAM 으로 데이터를 넘기고 우리는 변수에 값을 받아볼 수 있게 된다(4:GPU RAM→DMA→CPU RAM) (참고9).
하지만 우리는 RAW 영상을 얻는 것이 아니라, 인코딩된 결과를 얻어야 할 때도 있다. 대표적으로 영상이 아니라 동영상을 얻어야 할 때, 모든 RGB 값들을 하나하나 쌓아 동영상을 만들지 않고, H264, MJPEG, MPEG 같은 과정을 통해 인코딩을 하게 된다 (참고14:인코딩과 코덱). 동영상뿐 아니라 JPEG 와 같은 포맷으로 인코딩시키려는 영상도 마찬가지이다. H264 블럭 또는 JPEG 블럭은 인코딩을 위해 특별히 설계된 하드웨어이다. JPEG 블럭은 DCT(참고12:Discrete cosine transform) 에 특화된 하드웨어 디자인일 것이고, H264 블럭은 연속된 영상에서 움직임을 포착하는 것에 특화된 하드웨어 디자인일 것이다 (이영렬 교수님은 이런 것을 주로 다루시면서 발명하고 특허도 내고 하고계시는것이겠군). 이런 블럭들을 통과한 영상을 다시 RAM 에 저장한다 (5:JPEG,H264 block). 인코딩된 영상은 마찬가지로 DMA 를 통해 (참고11:DMA 와 영상 요청에 대한 callback 과정) CPU RAM 으로 넘겨주게 된다 (6:GPU RAM→DMA→CPU RAM) (참고10).
마지막으로 VCHI 를 통해 (참고11:VCHI) CPU 와 정보를 주고받으며 (7:Linux-VCHI-VPU) 앞서 글에서 언급한 JPEG/H264 블록, ISP 블록, Unicam 블록을 동등하게 제어하는 역할은 VPU 에서 돌아가고 있는 GPU 용 OS VCOS 의 역할이다 (참고13).
참고
8.
